In this article, we’ll configure an Apple Mobile Configuration Profile for iOS and macOS devices to connect to the VPN we created.
Articles in This Series:
Part 1 – Certificate Configuration
Part 2 – VPN Configuration
Part 3 (Current Article)
Part 4 – On Demand VPN
Part 3 – Mobile Profile
1. General Tab
Advertisement
- Open Apple Configurator 2. From the File menu, choose New Profile.
- Configure the General tab as follows (these options show up when installing to your device):
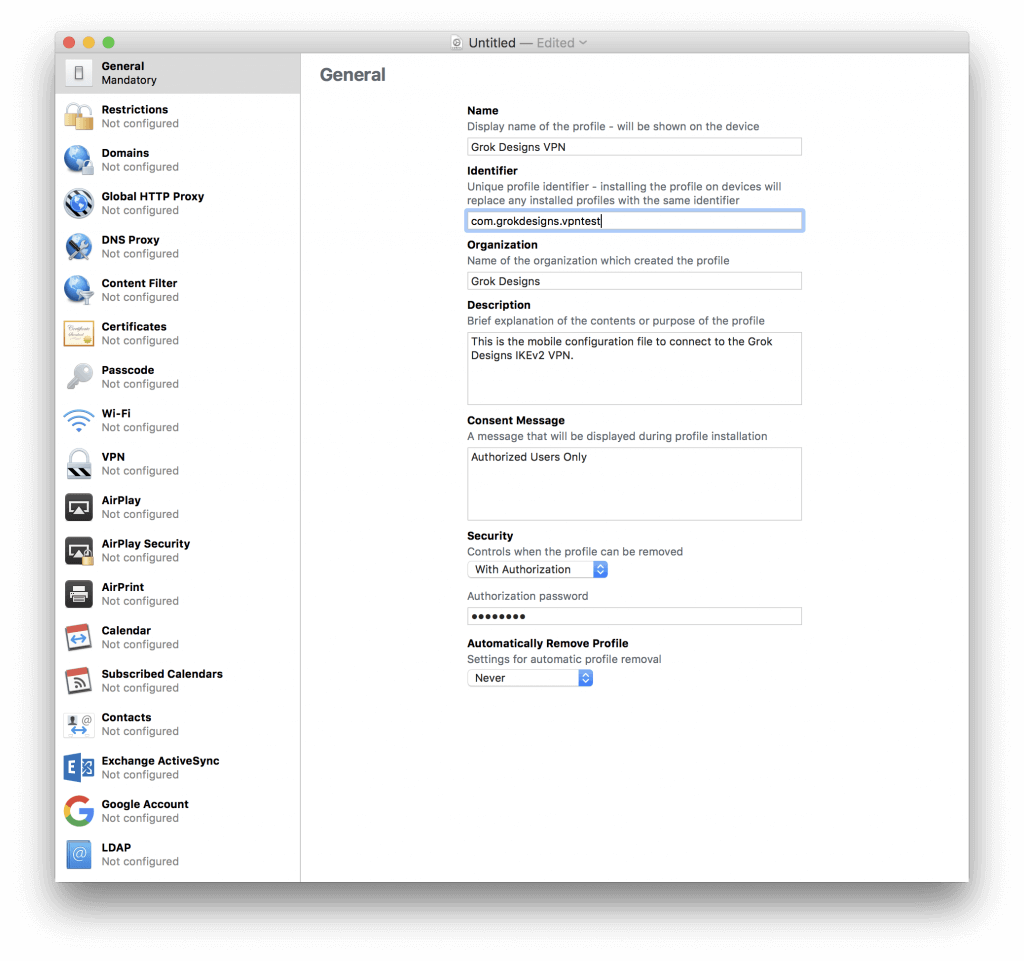
Figure 1 New Profile Window - Name: A descriptive name for your mobile profile.
- Identifier: This is a unique name for the profile. Typically, you
would use the FQDN in reverse. All this does is enable you to replace a
profile in place by using the same identifier. - Organization: Optional
- Description: Optional
- Consent Message: Optional
- Security: This allows you to protect the profile with a password to prevent it being removed.

2. Certificates Tab
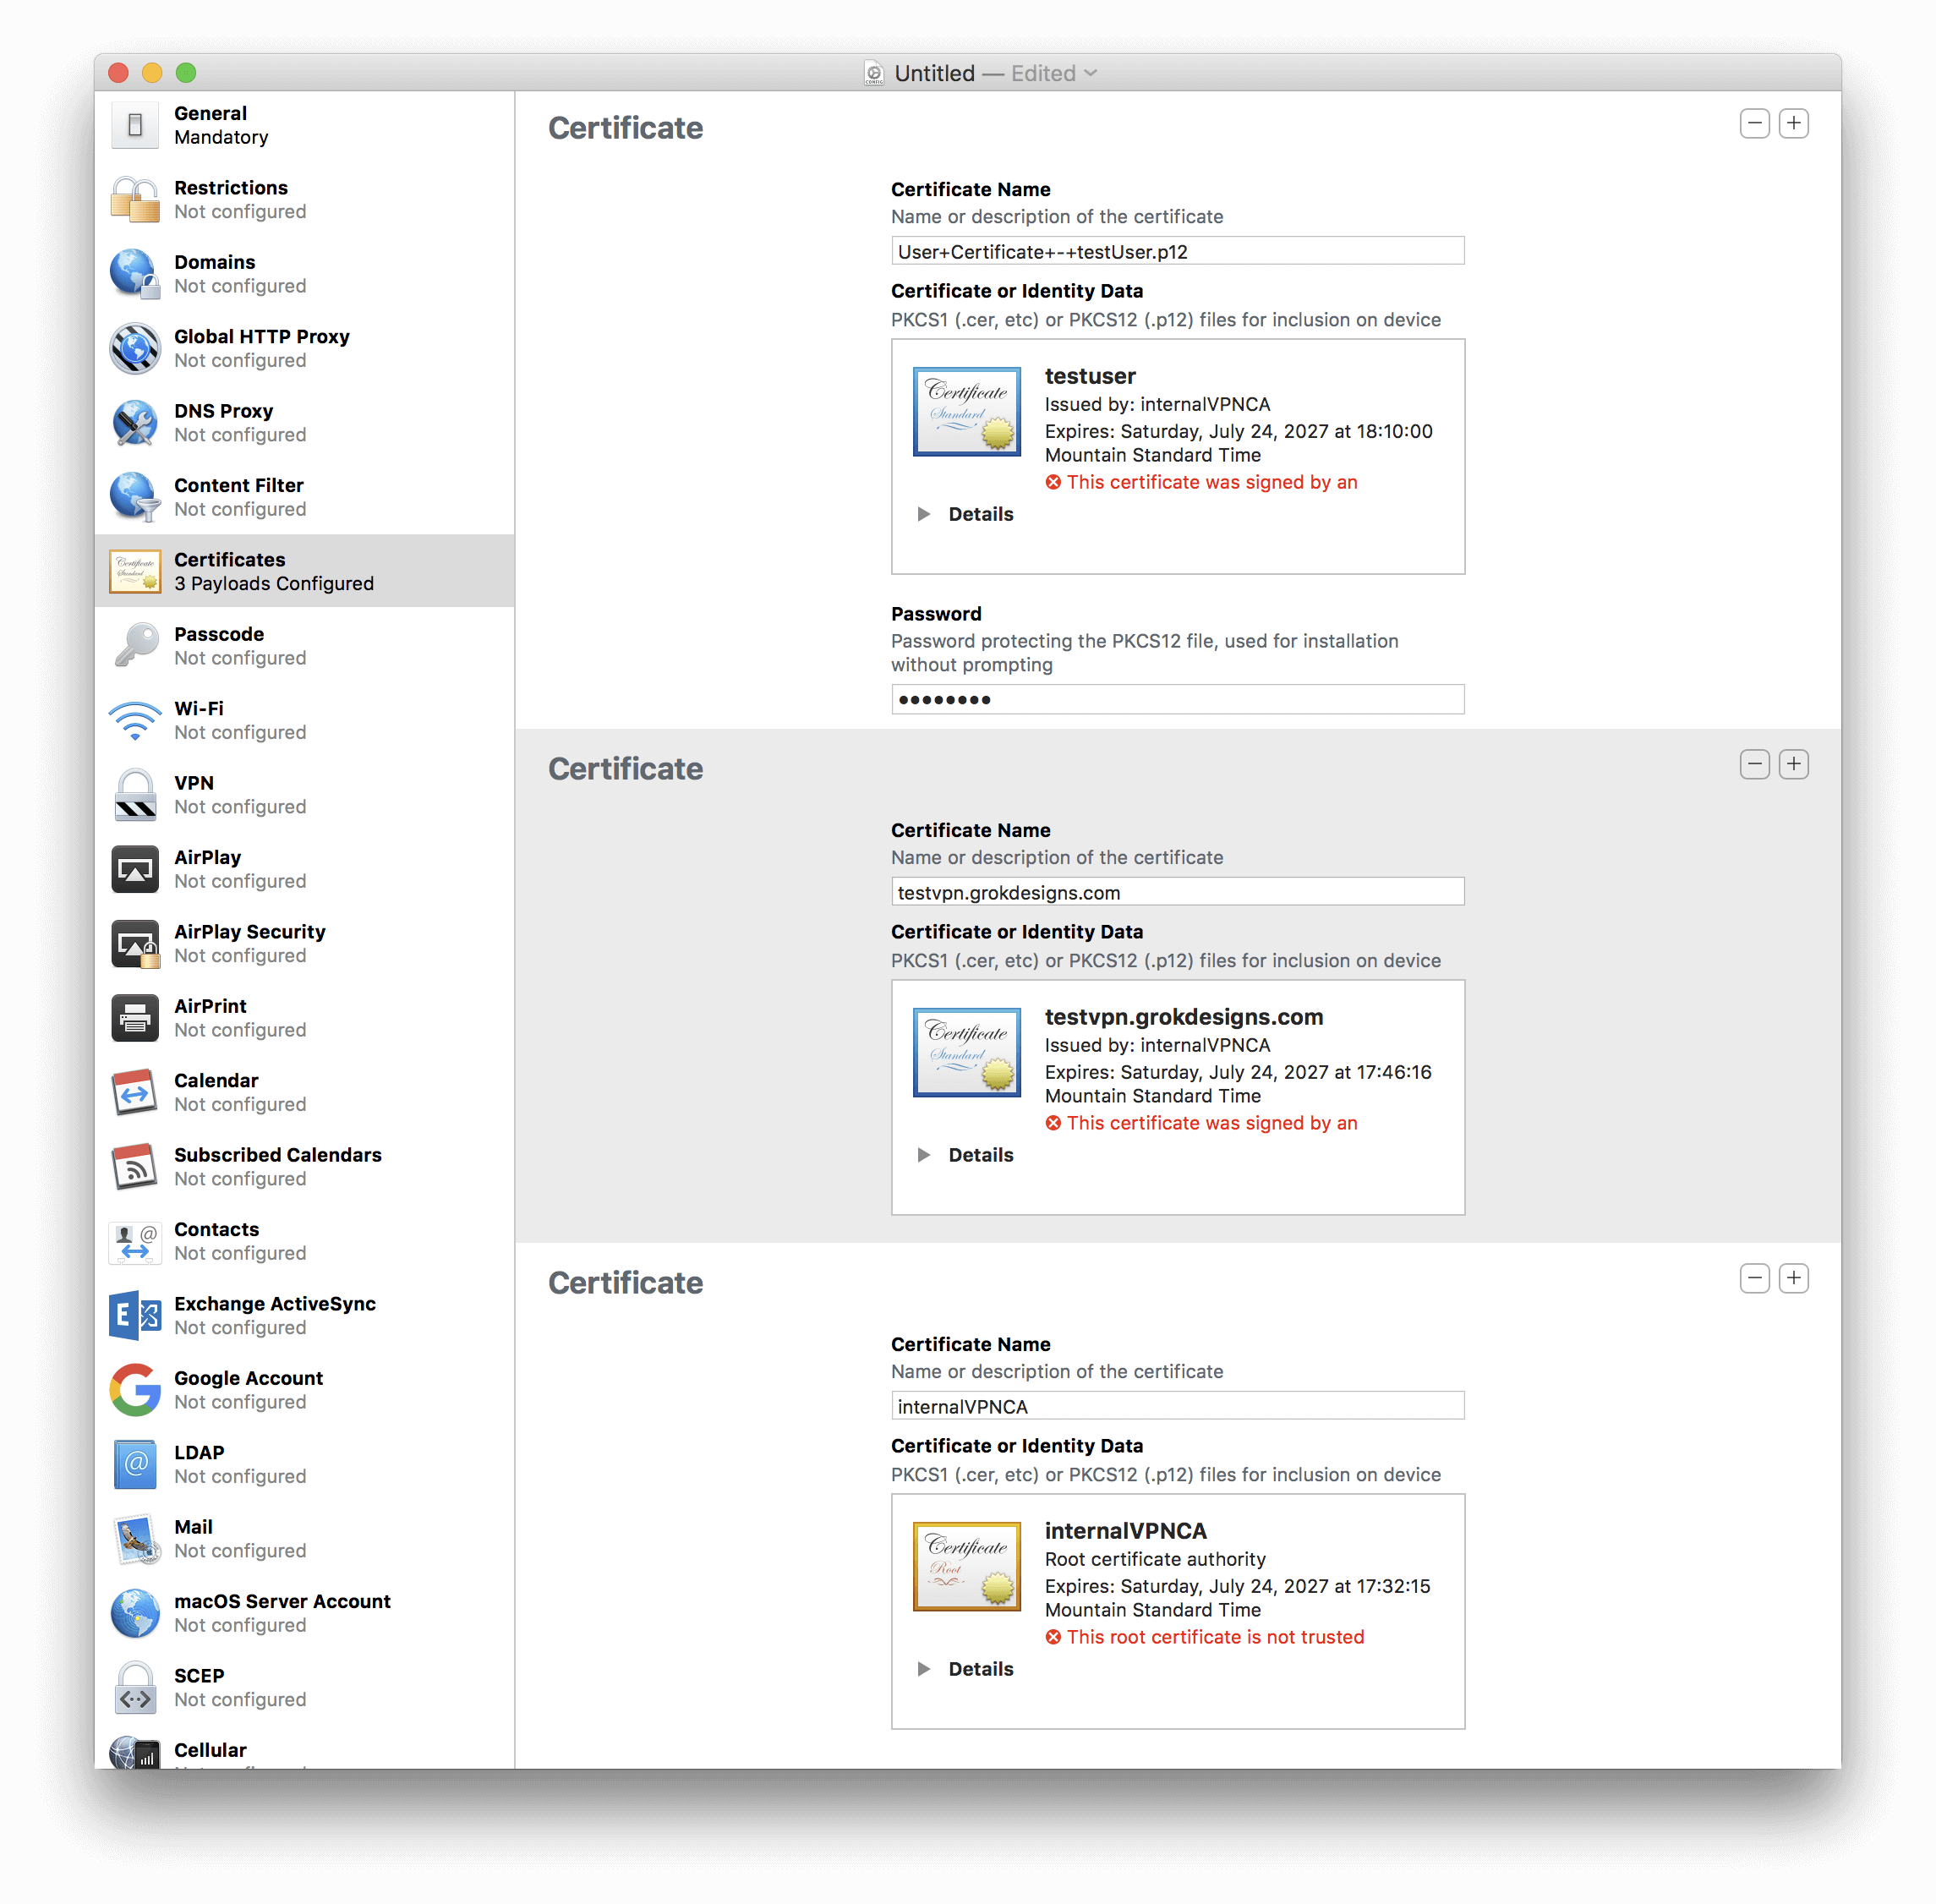
- Switch to the Certificates tab and click the Configure button.
- This will open a file browser. Choose the CA Certificate, the Server Certificate, and the User PKCS12 (.p12 File) Certificate.
- You will notice that the PKCS12 User Certificate has a password field and alert. You will need to enter the export password you specified when using OpenSSL to export the P12 file. The alert should go away after entering the password.
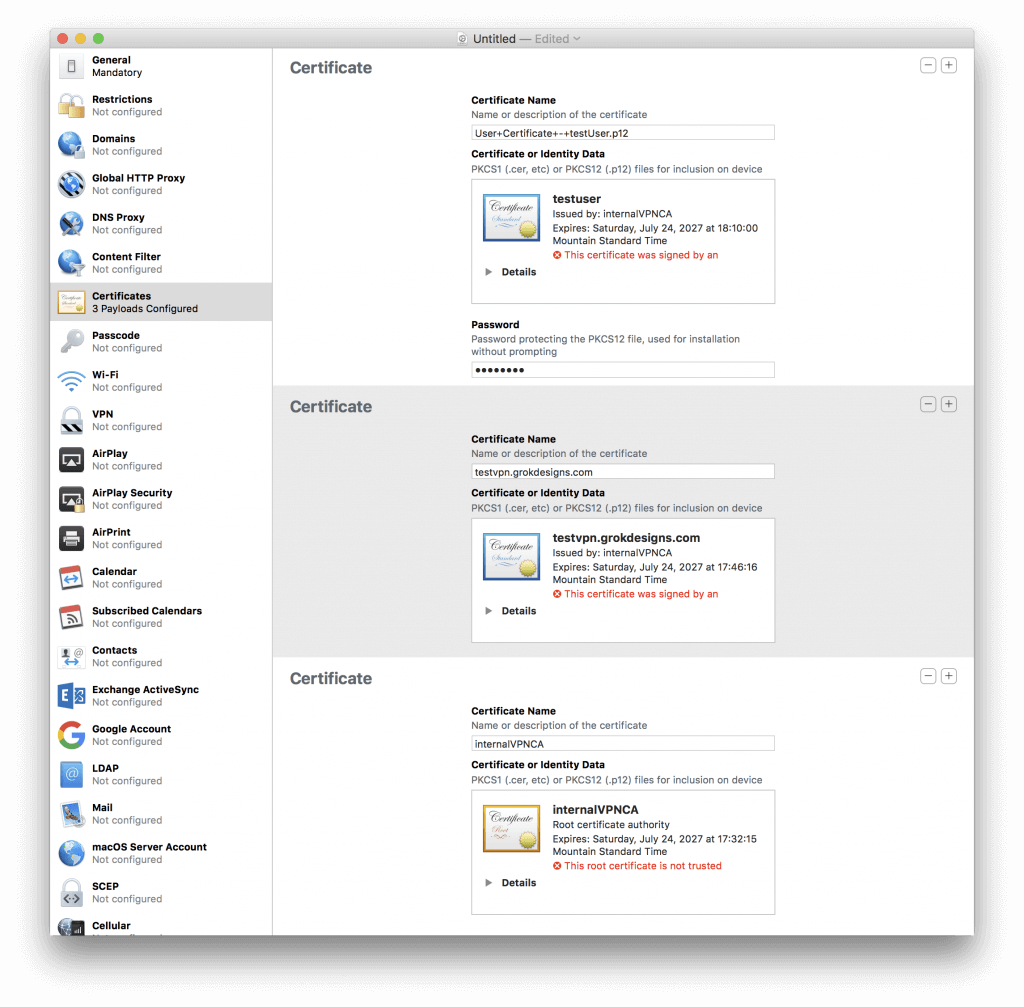
Figure 2 Certificates Tab
3. VPN Tab
- Switch to the VPN tab and click the Configure button. Configure as follows:
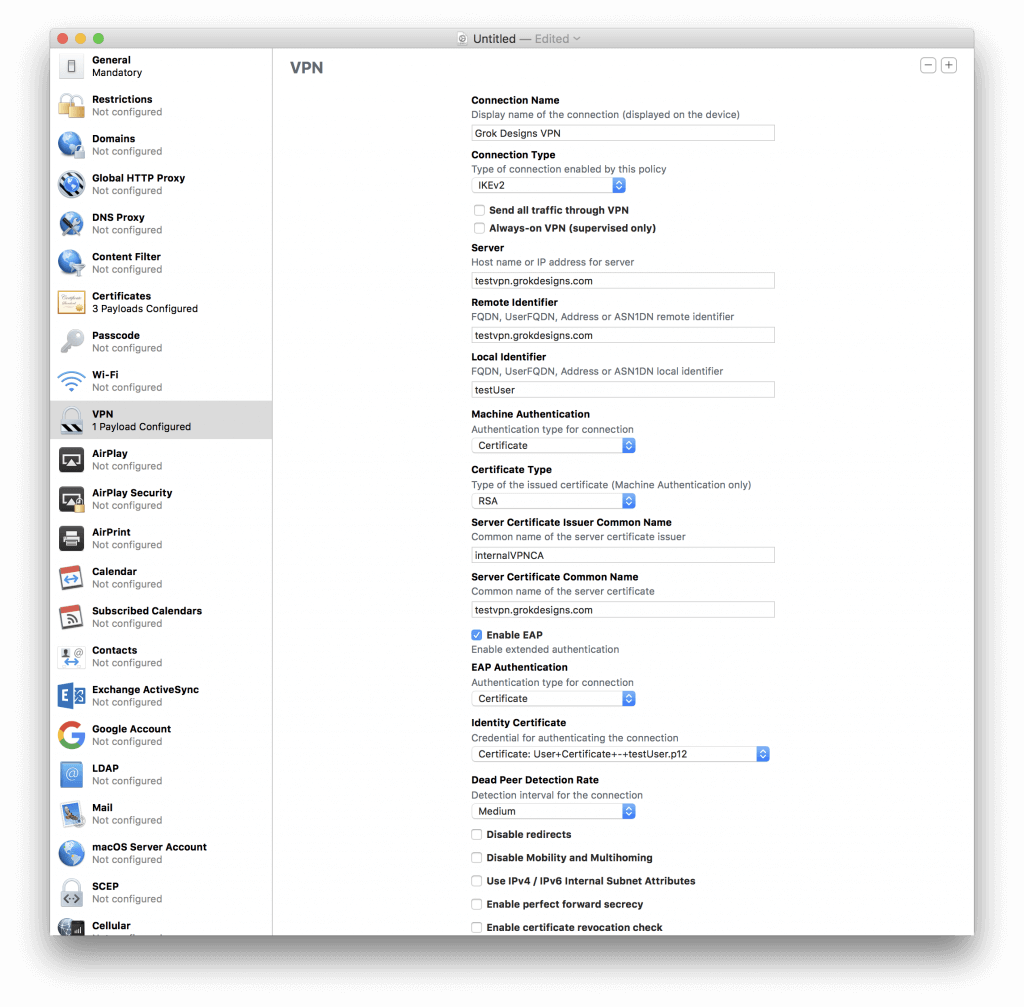
Figure 3 VPN Tab - Connection Name: A descriptive name that will show up in the VPN menu of your device.
- Connection Type: IKEv2
- Send All Traffic Through VPN: Unchecked
- Always-On VPN (Supervised Only): Unchecked
- Server: FQDN of the VPN Server
- Remote Identifier: FQDN of the VPN Server
- Local Identifier: CN of User Certificate
- Machine Authentication: Certificate
- Certificate Type: RSA
- Server Certificate Issuer Common Name: CN of the CA server you created (internalVPNCA in the example).
- Server Certificate Common Name: CN of the Server Certificate you created (should be the FQDN of the server).
- Enable EAP: Checked
- EAP Authentication: Certificate
- Identity Certificate: Select the User Certificate you imported.
- Dead Peer Detection Rate: Medium
- Disable Redirects: Unchecked
- Disable Mobility and Multihoming: Unchecked
- Use IPv4/IPv6 Internal Subnet Attributes: Unchecked
- Enable Perfect Forward Secrecy: Unchecked
- Enable Certificate Revocation Check: Unchecked
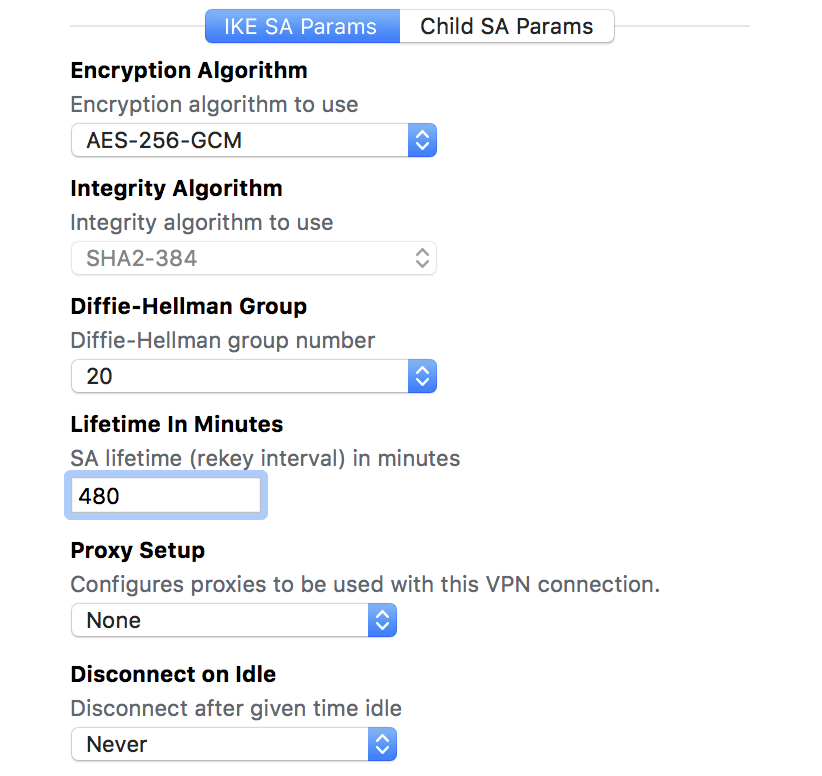
Figure 4 VPN Tab/IKE SA Params - Encryption Algorithm: AES-256-GCM
- Integrity Algorithm: SHA2-384 (This will be disabled when you choose AES-256-GCM)
- Diffie-Hellman Group: 20
- Lifetime in Minutes: 480
- Proxy Setup: None
- Disconnect on Idle: Never

Figure 5 VPN Tab/Child SA Params - Encryption Algorithm: AES-256-GCM
- Integrity Algorithm: SHA2-256 (This will be disabled when you choose AES-256-GCM)
- Diffie-Hellman Group: 20
- Lifetime in Minutes: 60
- Proxy Setup: None
- Disconnect on Idle: Never

4. Save and Push File – Mobile
Advertisement
- Choose File\Save from the Apple Configurator 2 menu. Save your mobile profile to a location of your choosing.
- To add the profile to a mobile device, connect the device via USB and wait for it to appear in the Apple Configurator 2 main window. Once it does, click on it once to ensure it is selected, then click the Add button, choose Profiles, and select the profile you just saved.
- Follow the prompts on your device to install the profile. Ensure it shows up in Settings\General\Profiles & Device Management.
- Go to Settings\General\VPN and ensure that the VPN you created in the profile shows up. Select it and change the toggle under Status to connect (test off of Wifi).
4. Save and Push File – macOS
- To install the Mobile Configuration Profile on your Mac desktop or laptop, simply double-click the file you saved and follow the prompts to install it.
That’s it! You’re done!
There’s one more section of this tutorial left, if you want it. To force your VPN to connect when you’re not connected to trusted or internal networks, proceed to Part 4 – On Demand VPN!
Advertisement
Hi,
I followed all your instructions, and I have the same problem as I have with any other IKEv2 instruction… after I installed the profile on the iOS device… the connection keeps on trying but never connect.
My device is connect to the wifi, and I use vpn.mydomain.com for FQDN.
In my DNS I point that address to the local IP address of the PFSense box OR the external fixed IP of our network… nothing works
I config an OpenVPN and this works like a charm, but I need it to be AlwaysON and it can only be acheived with IKEv2 on iPhone.
In terms of PFSense I’m kind of a newbie, how can I troubleshoot where the problem is ?
Thanks
I found the problem, as mention in the pfsense help page https://doc.pfsense.org/index.php/IKEv2_with_EAP-MSCHAPv2
Set Encryption algorithm to 3DES or, if there are no iOS/OS X devices, AES 256
Set Hash algorithm to SHA1, or, if there are no iOS/OS X devices, SHA256
I change that in Phase 1 and 2 and also on the mobile profile and now it’s working !!
Thanks for the tutorial 🙂
Glad you got it working! It’s strange that changing the algorithms fixed it. I specifically went with more secure algorithms because iOS/macOS support them. My first guess would’ve been something related to trying to connect to VPN internally. I typically configure my profiles to avoid connecting when on a trusted internal network to avoid the additional overhead. This actually came up in a Reddit thread a while ago and my opinion is still that avoiding connecting to VPN when you’re already on the trusted network is best practice.
Thank you for the great tutorial, Chris.
A quick note: you have to check the option “Enable Perfect Forward Secrecy”, otherwise VPN connection will be dropped upon next rekey attempt (~46 minutes in my case), as macOS will not be proposing DH20 on child revocation.
More details here: https://forum.pfsense.org/index.php?topic=127696.0
Tested on pFSense 2.4.2, MacOS 10.13.3
@ANDREY Can confirm that PFS needs to be enabled in order to rekey, otherwise connection will be dropped. However, I also can confirm that the proposed encryption algo (AES_GCM_16) stays intact after rekeying.
Thank you so much for this tut, I finally made it work using it!
I think there might be a mistake:
In pfSense you configure the SHA384 hash algorithm but in the iOS profile we have to use SHA265 (greyed out). I set it both to 265 because there was some error log about it and it works now.
Also in the iOS Configurator I had to write the CA name (in your case InternalVPNCA) in all lower case. I don’t know why but it kind if makes sense because that is how it is shown in the Certificates tab in the configurator.
Maybe this helps people. Thanks a lot again!
Hi,
Thanks for the great tutorial. I followed this and the one in pfsense forum and for the life of me I can’t get it to work. I always get to the message :
May 21 10:57:48 charon 14[JOB] deleting half open IKE_SA with (ip of the client) after timeout
May 21 10:57:18 charon 14[NET] sending packet: from (ip of the server)[4500] to (ip of the client)[13001] (547 bytes)
May 21 10:57:18 charon 14[NET] sending packet: from (ip of the server)[4500] to (ip of the client)[13001] (1248 bytes)
May 21 10:57:18 charon 14[ENC] generating IKE_AUTH response 1 [ EF(2/2) ]
May 21 10:57:18 charon 14[ENC] generating IKE_AUTH response 1 [ EF(1/2) ]
May 21 10:57:18 charon 14[ENC] splitting IKE message with length of 1730 bytes into 2 fragments
May 21 10:57:18 charon 14[ENC] generating IKE_AUTH response 1 [ IDr CERT AUTH EAP/REQ/ID ]
You should avoid configuring the Rekey interval to the same value as on the server end, in order to avoid a chance of establishing two simultaneous tunnels. See: https://docs.netgate.com/pfsense/en/latest/troubleshooting/ipsec-duplicate-sa.html?highlight=rekey
You also need to provide DNS settings in the IKEv2 section of the profile, otherwise the profile will fail to install on macOS.
Dawid’s comment is correct (using Catalina), DNS settings are required, otherwise your profile will not install with the always helpful Apple error message:
“Profile installation failed.
The ‘VPN Service’ payload could not be installed. The VPN service could not be created.”
I dug into the console logs, here is the relevant line:
error 16:47:35.728663+0800 mdmclient Failed to save configuration vpnprofile because it is invalid: Error Domain=NEConfigurationErrorDomain Code=2 “configuration is invalid: Missing both DNS servers and DNS search domains” UserInfo={NSLocalizedDescription=configuration is invalid: Missing both DNS servers and DNS search domains}
Also for noobs like me, the VPN won’t pass any traffic until you add firewall rules to the Firewall/Rules/IPsec section.
Thanks KANYE, I was hitting this issue also and this solved it.
Hello,
I had this working previously (it still works on my phone), however, I misplaced the mobileconfig file. Trying to create a new one following the steps, I get this error:
Initiator init received notify error Error Domain=NEIKEv2ProtocolErrorDomain Code=14 “NoProposalChosen” UserInfo={NSDebugDescription=NoProposalChosen}
Any ideas on what might be causing this?
I was able to resolve this, I am using different integrity Algorithms and DH Groups in my VPN setup, which was causing issues.